iHeartFaces’ Fix-It Fridays #8 – Beautiful Blues
Fix-It Fridays #8
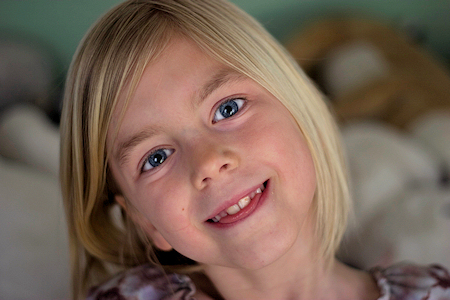

First photo is the original version. Second photo is my “Fix-It”. So, what did I do to the photo?
In Paint Shop Pro Photo X2 Ultimate, I did a smart fix with overall brightness at 21, shadows at -4, highlights at 21, focus at 56, and saturation at 0. At this stage I made a copy.
Then on the original, I ran the Time Machine’s Cross Process at 30%. I proceeded to Nik Color Efex 3 and applied the brilliance/warmth tool at 50%/70%. I also ran the Foliage tool at #2, 50%, followed by Old Photo #6, Grain 0%, Brightness 27%, protect Shadows and Highlights 100%.
I then cleaned up the eye area with a little dodging and I lightened the hair a bit, too. Ringing the eyes with a touch of burning, I also brightened them with dodging, and finally went in and enhanced the beautiful blues with the “Change target to” tool at 39% opacity. While here, I went in with the dodge tool (smoke brush at 28%) and lightly took out some of the “yellow” on the girl’s nose and teeth.
At this point, I applied my copy of the smart fix image to the altered image and brought the opacity down to around 42%. Once the layers were merged, I did a bit of softening around the edges. Once done, I cropped to a 5×7 size, and finally reduced the image to 450x321pixels
And that, friends, is how I took the first photo and transformed it into the second image.

:clap:
Comment by Cheri @ Blog This Mom! — 2009/03/29 @ 21:57
Thank you, Cheri. She’s a cutie, isn’t she?
Comment by DaGoddess — 2009/03/30 @ 00:53